Ready for the spring splash? Make sure to follow these spring commissioning tips so that you and your boat are ready to hit the Chesapeake when the warm weather finally arrives.
As I grow older, I have learned that the best tool for remembering—or rather not forgetting—important things is to write them down. That’s why every spring and fall I have a checklist that I follow, even after years of springtime ‘fitting out.’ It’s easy to forget something especially if you are in the middle of getting the boat ready and some issue crops up that demands your full concentration. And, after all, if airplane pilots rely on detailed checklists to fly their planes, then they must be a good enough solution for powerboaters as well!
Thankfully, today’s motorboat owner or skipper doesn’t need to start from scratch in building a checklist. Boater’s organizations, marine publications, and advocacy groups publish comprehensive checklists for both the sailboat owner and motorboater. I copy their lists, using them as a guide, and edit them as needed to suit my own individualized requirements, since all boats and their equipment (as well as quirks) are essentially somewhat different.
If your powerboat is yard-maintained, the yard mechanic or contracted mechanical services provider will take care of your boat to the extent contracted, and they will no doubt almost always do a very good job. However, they may have hundreds of boats to commission every year, so make sure that you follow your own checklist and be sure that it is comprehensive; don’t rely completely on anyone else unless they know your boat well. It is, after all, your boat, and its integrity is ultimately your responsibility.
I have selected a few key points based on my own checklist, topics that I feel are very important for a motor boater to attend to every spring prior to launching. These are only a few of the many potential line items too numerous to list here, but these are a start.

Below the Waterline
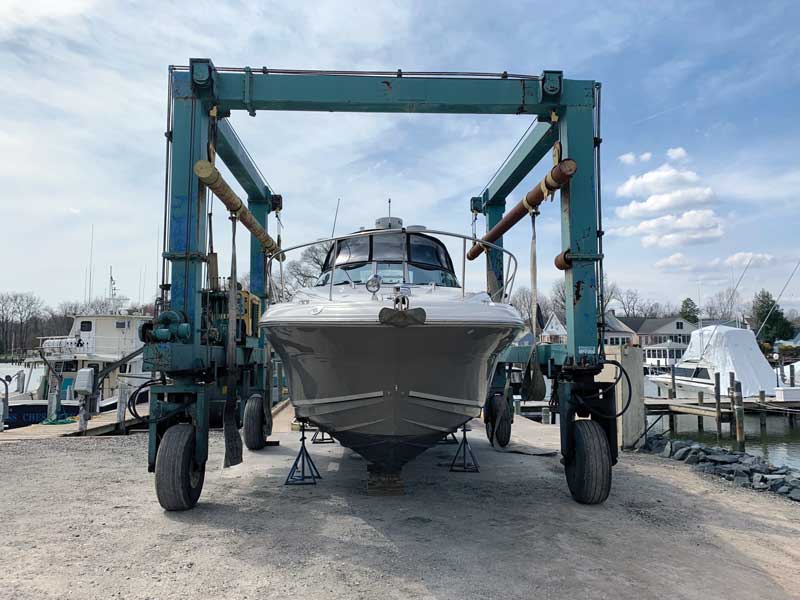
The first place to begin is, of course, outside and below the waterline for the sake of access and convenience. I begin by inspecting the prop for dings, pitting, and distortion. Your prop is the ‘canary in the coal mine;’ pitting may be a sign of electrolysis. Distortion of the shape of your prop due to, say, striking a small buoy last season or piece of wood, can set up vibration that will wear out your cutless (not ‘cutlass’) bearing in double-quick time. Make sure that the cotter pin at the end of the shaft is intact and secure. Grip the prop and try moving the shaft up and down and side to side. If it’s loose and can be wiggled, the cutless bearing may need to be replaced. You don’t want any play in the shaft. Likewise, check the rudder stock to make sure that it hasn’t been bent. Operate the wheel or tiller to ensure that the steering works correctly and check the rudder bearing for any slop in the movement. Walk around the boat and inspect the hull for stress cracks. If you have a depth transducer, make sure that it is clean and not painted as this will adversely affect its operation.
Make sure that your engine intake sea strainer cover is not clogged and is free of corrosion, clean and properly secured. Inspect, lubricate, and exercise seacocks. Failed seacocks are a common cause of sinkings. Seacocks and thru-hull valve fittings don’t get enough attention; they need to be lubricated and opened/shut from time to time. Clear any barnacles out of them from the outside. Too often seacocks are ignored because they are not easily accessible, or because boat owners are hesitant to shut them, thinking that they might forget to reopen them before getting underway next time. However, there are ways to remind yourself, with little notes or tags or some manner of visible reminder, to get into the habit of closing and reopening them.
If you are out of town on business and your boat is on her mooring when a storm blows up, it’s good to know that your boat’s seacocks are shut. You’ll sleep better. Operate and grease all seacocks to make sure that they are free to turn. Cone-type seacocks can be easily disassembled and lubricated; to grease a ball valve, close it, and apply a dollop of waterproof grease from both inside and outside the boat. Work the valve a few times to distribute the grease.
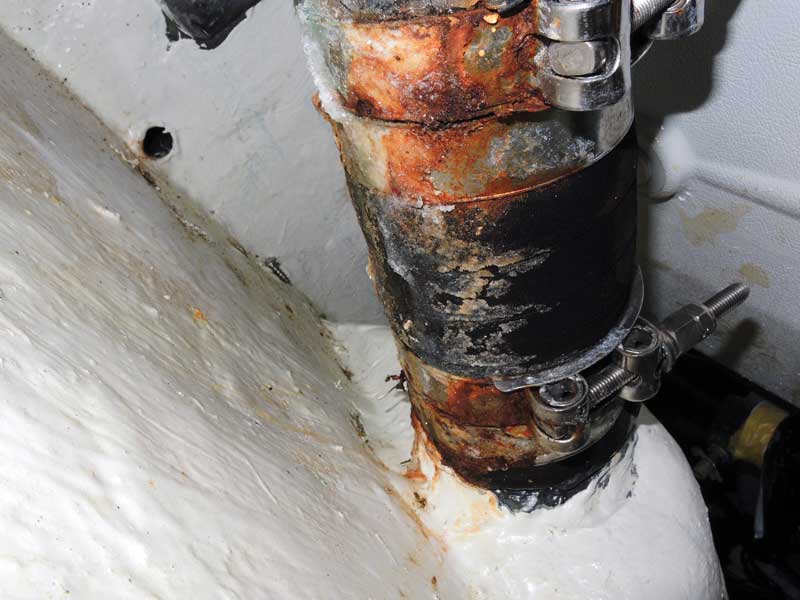
Also check the engine shaft and rudder stuffing boxes for correct adjustment. After launching, and underway, have a look below (or have someone look for you) and note that a stuffing box should leak no more than two or three drops each minute when the prop shaft is turning. Over time, the packing material gets compressed and hardens, and the lubricating grease wears off. Check the shaft log hose for deterioration and rusty hose clamps.
No matter what anyone says to the contrary, replace your zincs every year. Don’t re-use them, wire brush them, etc.; discard them and clean the mating surface to the rudder or whatever structure with emery cloth or sandpaper and ‘elbow grease.’ Bronze propellers are expensive, so you don’t want yours dissolving like a sugar cube beneath your transom with all the stray electrical current in the water around crowded marinas and busy harbors. Check your engine and cooling system’s ‘pencil’ zincs as well; these are too often ignored or forgotten. Raw-water cooled diesels will have one or more pencil anodes situated in inconvenient locations around the block; these too must be checked and probably replaced. Some freshwater-cooled diesels also have zincs in their heat exchangers.
Inspect all around the hose clamps for rust and replace as necessary. Double-clamp fuel lines and exhaust hoses (as the Coast Guard recommends) with marine-rated stainless steel hose clamps. Inspect all hoses for stiffness, rot, leaks, and cracking, and replace any that are faulty. Make sure they fit snugly. Failed hoses and clamps have sent many a boat to the bottom of the harbor.
Small Issues Matter
Small issues matter, especially if you are stopped by a boat of Coast Guard Officers who happen to be terribly bored that day. So… check the expiration dates on flares. Inspect any fire extinguishers. Replace if more than 12 years from the date of manufacture or if their age is unknown. Be sure to have properly sized and wearable lifejackets in good condition for each passenger, including kids. Check inflatable lifejacket cylinders and dissolvable “pill” bobbins in auto-inflating models. Check your running lights for operation and spare bulb inventory. Replenish any first-aid kit items that may have been used last season or are expired. Of course, check the operation of VHF radio(s), and make sure that your boat registration is up to date. Don’t forget your boat trailer tags.
Change your primary and secondary fuel filter elements as a matter of course. It’s cheap insurance. If you’ve left your batteries onboard over the winter, hook them up to a trickle charger. Inspect all terminals for signs of corrosion. Grease the posts and clamps with Vaseline.
Lower your anchor and lay out the rode for inspection. It’s better to find a damaged nylon rode now than when you least want to. This is a great time to re-apply markings on the chain and/or rope. Check that anchor shackles are securely moused with seizing wire and that the bitter end of the rode is secured to the boat!
Orange non-toxic water system antifreeze is troublesome because bacteria love it, creating smelly gas and souring the whole system. Flush out the antifreeze with fresh water, then partially fill the tank, add a quarter cup of liquid chlorine bleach, and run each faucet/foot pump in turn until the water coming out smells of bleach. Let stand two or three hours, then flush the system through again to kill any bacteria and sweeten the system.
Pump a 50:50 solution of water and white vinegar through the heads and leave it overnight to clean mineral deposits on the inside of the bowl, pump, and valves. Follow up with a healthy shot of head lube or baby oil to lubricate the pump.
Operate the wheel to ensure that the steering system works correctly. Check the rudder bearing for unusual play or movement.
Inspect fuel tanks, fuel pumps, and filters for leaks. Ensure that portable tanks and lines are completely drained of stale fuel before filling with fresh fuel. Clean or replace fuel filters and/or fuel-water separators if not done before winterization.
Clean and tighten electrical connections, especially both ends of battery cables. Use a wire brush to clean battery terminals.
Inspect rubber outdrive bellows for cracked, dried, and/or deteriorated spots (look especially in the folds) and replace if suspect.
Inspect the outer jacket of control cables. Cracks or swelling indicate corrosion and mean that the cable must be replaced.
Check both ends of the shore power cable connections, as well as the shore power receptacle on the boat, for burns, which indicate the cable and/or boat’s shore power inlet or the dock’s receptacle must be replaced.
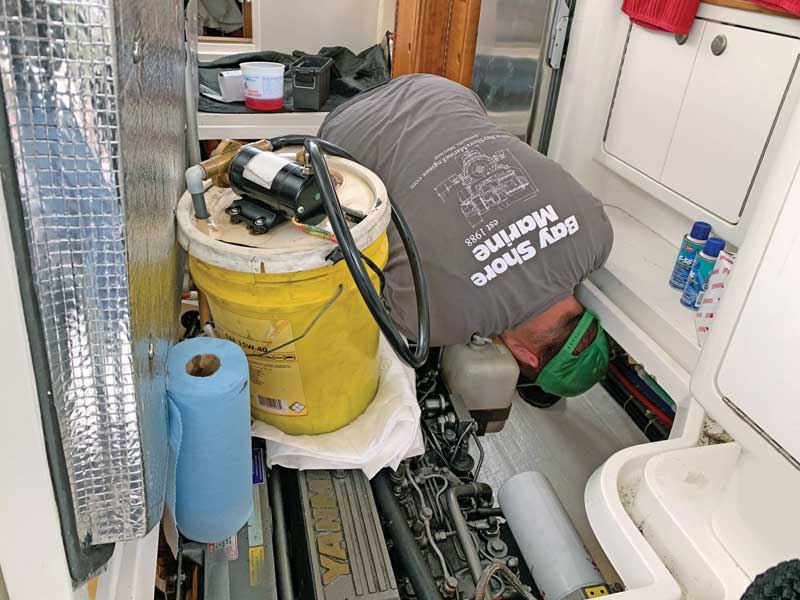
How long has it been since you changed your impeller? It’s inexpensive insurance. Install a new one and keep the one you removed as a spare.
Change drive belts at least every other year. They wear out and become harder to tension. They should deflect no more than half an inch when pushed with a finger. Keep the one you’ve just swapped out as a sparWe.
Finally, take a look at the DC ground connection to the engine block. This is a prime source of electrical problems. Make sure the wire terminal is clean and secure and smear it with petroleum jelly.
By Capt. Michael L. Martel