Here's David "Merf" Moerschel's two-part series from the August and September issues of PropTalk:
 Does Your Boat Have a Boat Information Book?
In recent years boat builders have begun providing a book that covers some important information on their boat, such as her rig, engine, and systems. Some also cover minor details on operation, maintenance, and safety. Those of us who have chartered will recognize these because they are used as a basis for the charter company’s familiarization lecture.
The values of such a book are intuitively obvious. If your boat doesn’t have such a book, why not create your own “Boat Information Book” (BIB)? This article is presented as a guide to producing one.
To start, design your book to provide an easily understood reference of your boat’s basic information and operating procedures. You will go through a number of iterations leading to a final. That’s normal. Don’t get too detailed by including all the manuals, specs, parts, etc.; otherwise, the end product could mirror the NYC phone book. It’s best to reference major documents or manuals and keep the “originals” ashore. A useful BIB is designed more as a source of support or guide rather than an in-depth “how to” document.
Using a preliminary outline, begin collecting and organizing all the data on all the topical areas and systems. Much of this information probably languishes in one of your files somewhere anyway. Where there are gaps, contact equipment manufacturers, research their websites, and use those 800 numbers. Pictures and diagrams showing particulars (even if hand-drawn) are very beneficial.
There is no right way to organize your BIB. Perhaps a cover page could show boat name, hailing port, registration or documentation numbers, and perhaps a picture. One outline might include the following topics and the type of data captured in each:
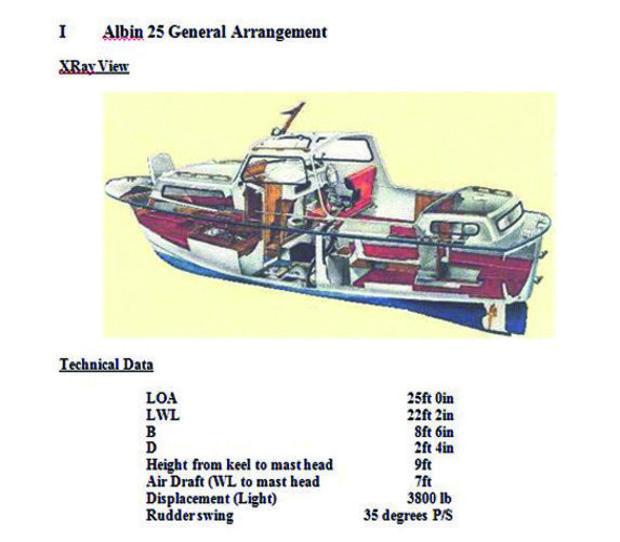
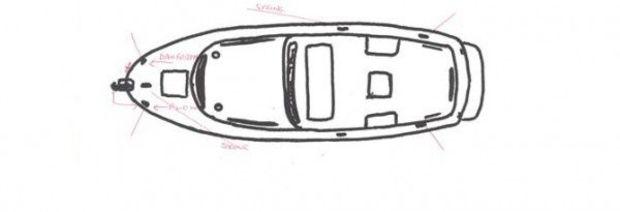
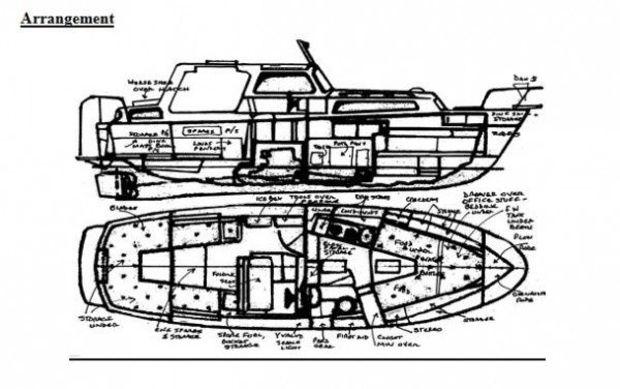
General Arrangement. Include one or more diagrams of your boat. If you don’t have drawings search Yacht World or other sources and scan them for including in the most useful place. List the physical parameters: LOA, LWL, B, D, Air Draft (height from the waterline to mast head), and Displacements (Light and laden).
 Safety.
 List all your onboard USCG required safety equipment (PFDs, flares, etc.). If you go offshore, include the raft, MOB pole, EPIRBs, and the like. Add the other gear that affect your ability to operate your boat safely such as radios, depth finder, compass, and charts. This is more an inventory than procedural.
Hull and Deck. Here is another place to insert a diagram or two, even if rudimentary with penciled-in information. One important grouping is the location and access to through-hulls and sea cocks. Show them on the diagram. Note settings under normal operations (holding tank overboard discharge—closed), overboard discharge (above and below the waterline), fuel vents, and propane overflow. A schematic of the deck arrangement showing cleats and the normal placement of mooring lines is also useful.
Propulsion. List the basics of the engine type, model or series, and horsepower. Don’t forget access to your engine, transmission, and shafting. There may be a few tricks involved such as pawing through an assortment of fenders, lines, a crab net, or other stuff to gain direct access. Include data on the reduction gear, shaft, and appendages. What type of coupling? Stuffing box, cutlass bearing diameter and length, shaft diameter, and prop diameter, pitch and rotation. Don’t forget rudder and steering system data. If installed, this is also probably a good place
to include data on thrusters.
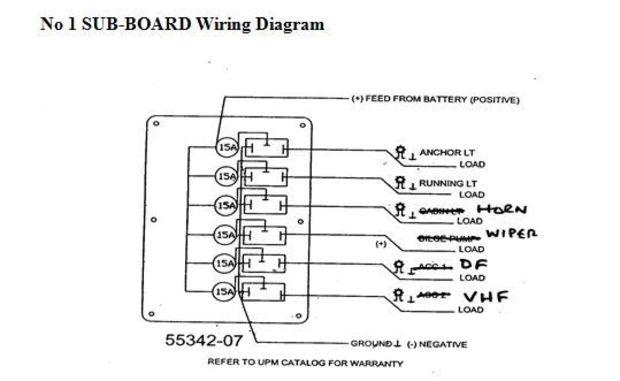
Electrical. Do a separate section on the 110 VAC and 12 VDC systems. Diagrams for each should be limited to identifying the location of breaker panels and circuits (including secondary panels for bridge circuits such as nav lights).
110 VAC data should note shore power cords, galvanic protectors if any, a table of the breaker panel locations (with a list of circuits), any integral meters, and polarity. If there are separate AC circuits, identify each and what they serve. Include information on the battery charger. What major appliances are aboard? Don’t ignore the Gen Set if your boat is so equipped.
12 VDC systems will usually have separate cranking and house batteries (singly or a bank). Like the 110 VAC, show the location of the breaker panel with the circuit listing. List the type of each battery, cranking amps, what group, and the date each was installed. Is there an inverter or a solar panel? How is the bilge pump wired?
Electronics. The ongoing march of electronic gizmos necessitates a separate section to cover plotters, radars, auto pilot, fish finders, fathometers, devices such as wind speed and direction, and water temperature (many of which are now integrated packages). Add the entertainment parts: stereo, TV, DVD. Each should be identified in some detail.
Propane. The most fundamental gas appliance is the stove, but other appliances could be so powered (cockpit grill, cabin heat, hot water heater, and three-way fridge). This is one place where a diagram is important, showing the locker with access, overboard overflow, component module, bezel, solenoid, sensors, and lines. Include data on tank capacities and composition (e.g., aluminum) and tank switching. Is there a CO2 alarm? Note the DC board breaker controlling the system. (Although less popular, the same basic format would apply to CNG.)
 Tankage and Systems.
 In addition to a propane locker with its tank, there are also several other independent systems onboard: fuel, fresh water, waste, and possibly one for gray water (as required by some states). Indicate the capacities of each and the material of each tank. Include a diagram showing each system possibly using separate colors for each. The fuel system should show the off-take and return lines and valves, filters, and the location of the bleeder. If the tank can be “dipped” as in the old days, note it. The fresh water system should include filters, accumulators, pumps, valves, and dedicated breakers. Show the linage, “Y” valves, sea cocks intake and discharge), and pump-out plate for the waste system. Identify any tank access ports for each of these systems if so installed.
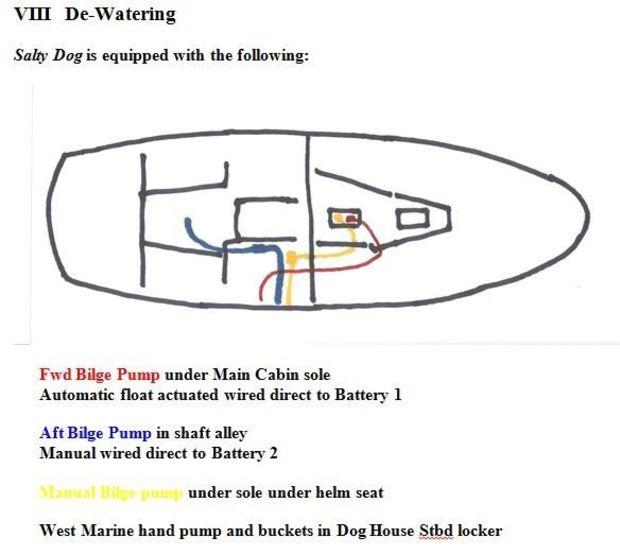
De-Watering: List your boat’s bilge pumps and location. Are they all automatic? How wired? How accessed (they do get stopped up?). What are their capacities? Are there any hand back-ups?
Ground Tackle. Identify the anchor type (e.g., plow), numbers and size of chain, and scope and size of the rode; or size and length of an all-chain rode. Are the rodes marked and how? Which anchor is primary; which secondary? Are there others such as a storm anchor or sea anchor, and where are they stowed? Include additional tackle, such as dock lines, warps, small stuff, splicing gear, towing bridle, warps, and fenders.
Tenders, etc. Most cruising boats have a tender: hard, RIB… perhaps a kayak or even a sailboard. Include information on these including outboards, onboard equipment, and more.
There may be other topics that apply to your situation. Notwithstanding, you now have all this information and the form of your BIB may is beginning to take shape. It is also probably true that a number of other uses and applications for your book have begun to foment in your mind. That’s great! In the next article, I’ll discuss some of the other uses and applications of your BIB.
PART 2: Applying the Benefits of Your Boat Information Book
Assuming you took up the challenge of creating your BIB, you will have already picked up on some of the benefits of the effort and the value of the derived outputs. When I did my first book several boats ago, I was surprised at what I learned about my boat that I had taken for granted I knew cold!
As you begin to compile your book, its value as a pure reference document will be pretty obvious. Often forgotten, it will also serve as a means of familiarizing guests (some of whom may be “newbies”) or new crew about your boat. Creating a BIB will also steer you towards several other areas. Let’s look at several of these.
 Lists:
 One result of the data collection process discussed in the previous article is to develop a few lists. Phone and fax numbers, emails of suppliers, chandleries, and your homeport mechanic are important. A list of the spares and consumables is next. Start with safety items such as batteries, replacement canisters for your inflatable vest, or redundancy for flares. What system spares will be carried aboard will depend on the type of cruising you plan. For Bay cruising, one need only cover “basic needs” such as a spare water pump impeller. If doing the Intracoastal and then off to the Abacos, Bahamas, having a spare water pump aboard is better insurance. In either case, that clumsy little tool used to replace the ring had best be aboard. In fact, why not have a list of tools to be retained aboard?
Electrical needs may require a closer look. The trend of boaters adding electrically based creature comforts and toys continues its exponential march. If you have not done an energy budget, do one. If it has been some time since your last one, update it. The resultant effort will generate a list of fuses, breakers, bulbs, and much more.
Maintenance details are contained in the various system manuals, but when you need to replace a filter, wouldn’t it be great to just refer to your BIB to verify whether that WIX oil filter is a compatible crossover to the engine manufacturer’s filter? So, make up a specific and detailed list of engine spares and replacement parts. Including web addresses and phone numbers of equipment manufacturers and suppliers will save time and reduce frustration. Identify oil capacities and types, same for transmissions, oil filters, Racor parts, water pumps, impellers, air filters, belts, and zincs (shaft and heat exchanger). The list can be expanded based on ancillary equipment such as a GenSet or the outboard for your tender.
Stowage Plan. From almost any perspective, how you stow your boat is one of the most important aspects of your boating experience. There is an old saying: “A place for everything; everything in its place.” Organize and be neat. Access and convenience are also considerations. When you want it, better know where it is stowed because you might need it… ASAP! Emergencies don’t have a lead time. Stowing the gear needed for safe and comfortable cruising must be planned around where all the lockers and storage areas are located. As an example, the lazarette or similar locker close to the helm can be particularly useful for stowing flares, signaling equipment, and other safety items. If big enough, stow the emergence tiller there as well.
Weight distribution affects performance and possibly safety. Racers carry only the essentials as not to negatively affect speed and performance. Back in the day of pure sail, it was common for ballast (usually rocks) to be moved around and even masts re-stepped forward or aft to improve performance. Cruisers tend to follow George Carlin’s rule of thumb by taking a smaller version of the stuff they have at home and bring it aboard. The end result could be a waterborne example of Grandma’s attic! And where all the stuff ends up can affect how the boat sails. Too much weight on one side produces a list to that side. More weight forward than aft puts her down by the head; too much aft the reverse. Pretty basic but often overlooked.
The key in deciding what and where gear should be stowed is balance. Equalize the weights port and starboard and fore and aft. Start with the location, capacity, and maximum loaded weight of your tanks. Usually, an aft tank will balance out one forward; a similar sized port tank balanced by one to starboard. Installation varies from boat to boat. There are many combinations and no real standard. Don’t ignore your anchor locker. If your boat’s primary hook has an all-chain rode, it will have to be offset by moving other loads aft.
The trick is to balance these fixed loads with the proper placement of your stuff. Vertical balance is as important as lateral. Heavier objects low; lighter stuff higher. Can goods under; cereal over.
Obviously, we all know this, but by being a bit more thorough by even weighing some stuff could improve your boat’s performance. Every little bit helps. For long-distance cruisers, special consideration should be given to jerry cans for additional fuel and fresh water stowed topside. These are usually secured mid-ships along the lifelines and may be on one side making compensation to balance a bit of a trick. A life raft stowed aft and low would be much better than higher on the coach roof.
Remember: your task is to equalize and balance the weights port and starboard and fore and aft with your onboard gear given the integral “fixed” weights on your boat.
Once you have figured out the best load-out scheme, make a diagram showing the location of each locker, bin, drawer, etc., and what is stowed in each. And stick to the regimen of that place for everything! When there are changes, make adjustments. They will probably be minor. What is important is that you now have the mind set.
Procedures. Many charter fleets have “how to” and “don’t do” lists. Some are quite detailed. It is a good idea for your BIB to have a few of these. How detailed you want to be is up to you, but there are a few topics that make good sense.
A few procedural “check off lists” seem in order: what to do when opening up your boat, getting underway, and securing. How many of us while on the way back home after a fun weekend wonder if we closed a seacock or shut some switch off? A posted and regularly shut down and lock up procedure could eliminate that worry as well as the wasted effort of going back to the boat when half way home to verify that all is well.
For cruisers contemplating an offshore transit, practicing heavy weather procedures is a must. Similarly, the steps in deploying life raft, activating the EPIRB, and seeing to the ditch bag could save lives. Why not formalize and document them?
Head and galley procedures are “boat keeping” issues. Both can prove problematic. The head list can be as simple as “Don’t put anything in the WC you haven’t eaten first!” A more detailed process for dockside and off shore pump out could save you larger problems and even avoid a fine. Lighting off and securing your propane system the same way every time is a safety issue. There are other individual preferred procedural areas you may wish to include such as deploying and securing your tender or possibly addressing dive gear for the extended cruiser.
The objective of these two articles was to put information about your boat to work for you and your crew. How you organize your BIB that best fits your style and needs is up to you. Hopefully, these thoughts have been helpful. Perhaps your book would even play well to that future potential buyer in meeting your asking price. #
 Does Your Boat Have a Boat Information Book?
In recent years boat builders have begun providing a book that covers some important information on their boat, such as her rig, engine, and systems. Some also cover minor details on operation, maintenance, and safety. Those of us who have chartered will recognize these because they are used as a basis for the charter company’s familiarization lecture.
The values of such a book are intuitively obvious. If your boat doesn’t have such a book, why not create your own “Boat Information Book” (BIB)? This article is presented as a guide to producing one.
To start, design your book to provide an easily understood reference of your boat’s basic information and operating procedures. You will go through a number of iterations leading to a final. That’s normal. Don’t get too detailed by including all the manuals, specs, parts, etc.; otherwise, the end product could mirror the NYC phone book. It’s best to reference major documents or manuals and keep the “originals” ashore. A useful BIB is designed more as a source of support or guide rather than an in-depth “how to” document.
Using a preliminary outline, begin collecting and organizing all the data on all the topical areas and systems. Much of this information probably languishes in one of your files somewhere anyway. Where there are gaps, contact equipment manufacturers, research their websites, and use those 800 numbers. Pictures and diagrams showing particulars (even if hand-drawn) are very beneficial.
There is no right way to organize your BIB. Perhaps a cover page could show boat name, hailing port, registration or documentation numbers, and perhaps a picture. One outline might include the following topics and the type of data captured in each:
General Arrangement. Include one or more diagrams of your boat. If you don’t have drawings search Yacht World or other sources and scan them for including in the most useful place. List the physical parameters: LOA, LWL, B, D, Air Draft (height from the waterline to mast head), and Displacements (Light and laden).
Does Your Boat Have a Boat Information Book?
In recent years boat builders have begun providing a book that covers some important information on their boat, such as her rig, engine, and systems. Some also cover minor details on operation, maintenance, and safety. Those of us who have chartered will recognize these because they are used as a basis for the charter company’s familiarization lecture.
The values of such a book are intuitively obvious. If your boat doesn’t have such a book, why not create your own “Boat Information Book” (BIB)? This article is presented as a guide to producing one.
To start, design your book to provide an easily understood reference of your boat’s basic information and operating procedures. You will go through a number of iterations leading to a final. That’s normal. Don’t get too detailed by including all the manuals, specs, parts, etc.; otherwise, the end product could mirror the NYC phone book. It’s best to reference major documents or manuals and keep the “originals” ashore. A useful BIB is designed more as a source of support or guide rather than an in-depth “how to” document.
Using a preliminary outline, begin collecting and organizing all the data on all the topical areas and systems. Much of this information probably languishes in one of your files somewhere anyway. Where there are gaps, contact equipment manufacturers, research their websites, and use those 800 numbers. Pictures and diagrams showing particulars (even if hand-drawn) are very beneficial.
There is no right way to organize your BIB. Perhaps a cover page could show boat name, hailing port, registration or documentation numbers, and perhaps a picture. One outline might include the following topics and the type of data captured in each:
General Arrangement. Include one or more diagrams of your boat. If you don’t have drawings search Yacht World or other sources and scan them for including in the most useful place. List the physical parameters: LOA, LWL, B, D, Air Draft (height from the waterline to mast head), and Displacements (Light and laden). Safety. List all your onboard USCG required safety equipment (PFDs, flares, etc.). If you go offshore, include the raft, MOB pole, EPIRBs, and the like. Add the other gear that affect your ability to operate your boat safely such as radios, depth finder, compass, and charts. This is more an inventory than procedural.
Hull and Deck. Here is another place to insert a diagram or two, even if rudimentary with penciled-in information. One important grouping is the location and access to through-hulls and sea cocks. Show them on the diagram. Note settings under normal operations (holding tank overboard discharge—closed), overboard discharge (above and below the waterline), fuel vents, and propane overflow. A schematic of the deck arrangement showing cleats and the normal placement of mooring lines is also useful.
Propulsion. List the basics of the engine type, model or series, and horsepower. Don’t forget access to your engine, transmission, and shafting. There may be a few tricks involved such as pawing through an assortment of fenders, lines, a crab net, or other stuff to gain direct access. Include data on the reduction gear, shaft, and appendages. What type of coupling? Stuffing box, cutlass bearing diameter and length, shaft diameter, and prop diameter, pitch and rotation. Don’t forget rudder and steering system data. If installed, this is also probably a good place
to include data on thrusters.
Electrical. Do a separate section on the 110 VAC and 12 VDC systems. Diagrams for each should be limited to identifying the location of breaker panels and circuits (including secondary panels for bridge circuits such as nav lights).
110 VAC data should note shore power cords, galvanic protectors if any, a table of the breaker panel locations (with a list of circuits), any integral meters, and polarity. If there are separate AC circuits, identify each and what they serve. Include information on the battery charger. What major appliances are aboard? Don’t ignore the Gen Set if your boat is so equipped.
12 VDC systems will usually have separate cranking and house batteries (singly or a bank). Like the 110 VAC, show the location of the breaker panel with the circuit listing. List the type of each battery, cranking amps, what group, and the date each was installed. Is there an inverter or a solar panel? How is the bilge pump wired?
Electronics. The ongoing march of electronic gizmos necessitates a separate section to cover plotters, radars, auto pilot, fish finders, fathometers, devices such as wind speed and direction, and water temperature (many of which are now integrated packages). Add the entertainment parts: stereo, TV, DVD. Each should be identified in some detail.
Propane. The most fundamental gas appliance is the stove, but other appliances could be so powered (cockpit grill, cabin heat, hot water heater, and three-way fridge). This is one place where a diagram is important, showing the locker with access, overboard overflow, component module, bezel, solenoid, sensors, and lines. Include data on tank capacities and composition (e.g., aluminum) and tank switching. Is there a CO2 alarm? Note the DC board breaker controlling the system. (Although less popular, the same basic format would apply to CNG.)
Safety. List all your onboard USCG required safety equipment (PFDs, flares, etc.). If you go offshore, include the raft, MOB pole, EPIRBs, and the like. Add the other gear that affect your ability to operate your boat safely such as radios, depth finder, compass, and charts. This is more an inventory than procedural.
Hull and Deck. Here is another place to insert a diagram or two, even if rudimentary with penciled-in information. One important grouping is the location and access to through-hulls and sea cocks. Show them on the diagram. Note settings under normal operations (holding tank overboard discharge—closed), overboard discharge (above and below the waterline), fuel vents, and propane overflow. A schematic of the deck arrangement showing cleats and the normal placement of mooring lines is also useful.
Propulsion. List the basics of the engine type, model or series, and horsepower. Don’t forget access to your engine, transmission, and shafting. There may be a few tricks involved such as pawing through an assortment of fenders, lines, a crab net, or other stuff to gain direct access. Include data on the reduction gear, shaft, and appendages. What type of coupling? Stuffing box, cutlass bearing diameter and length, shaft diameter, and prop diameter, pitch and rotation. Don’t forget rudder and steering system data. If installed, this is also probably a good place
to include data on thrusters.
Electrical. Do a separate section on the 110 VAC and 12 VDC systems. Diagrams for each should be limited to identifying the location of breaker panels and circuits (including secondary panels for bridge circuits such as nav lights).
110 VAC data should note shore power cords, galvanic protectors if any, a table of the breaker panel locations (with a list of circuits), any integral meters, and polarity. If there are separate AC circuits, identify each and what they serve. Include information on the battery charger. What major appliances are aboard? Don’t ignore the Gen Set if your boat is so equipped.
12 VDC systems will usually have separate cranking and house batteries (singly or a bank). Like the 110 VAC, show the location of the breaker panel with the circuit listing. List the type of each battery, cranking amps, what group, and the date each was installed. Is there an inverter or a solar panel? How is the bilge pump wired?
Electronics. The ongoing march of electronic gizmos necessitates a separate section to cover plotters, radars, auto pilot, fish finders, fathometers, devices such as wind speed and direction, and water temperature (many of which are now integrated packages). Add the entertainment parts: stereo, TV, DVD. Each should be identified in some detail.
Propane. The most fundamental gas appliance is the stove, but other appliances could be so powered (cockpit grill, cabin heat, hot water heater, and three-way fridge). This is one place where a diagram is important, showing the locker with access, overboard overflow, component module, bezel, solenoid, sensors, and lines. Include data on tank capacities and composition (e.g., aluminum) and tank switching. Is there a CO2 alarm? Note the DC board breaker controlling the system. (Although less popular, the same basic format would apply to CNG.) Tankage and Systems. In addition to a propane locker with its tank, there are also several other independent systems onboard: fuel, fresh water, waste, and possibly one for gray water (as required by some states). Indicate the capacities of each and the material of each tank. Include a diagram showing each system possibly using separate colors for each. The fuel system should show the off-take and return lines and valves, filters, and the location of the bleeder. If the tank can be “dipped” as in the old days, note it. The fresh water system should include filters, accumulators, pumps, valves, and dedicated breakers. Show the linage, “Y” valves, sea cocks intake and discharge), and pump-out plate for the waste system. Identify any tank access ports for each of these systems if so installed.
De-Watering: List your boat’s bilge pumps and location. Are they all automatic? How wired? How accessed (they do get stopped up?). What are their capacities? Are there any hand back-ups?
Ground Tackle. Identify the anchor type (e.g., plow), numbers and size of chain, and scope and size of the rode; or size and length of an all-chain rode. Are the rodes marked and how? Which anchor is primary; which secondary? Are there others such as a storm anchor or sea anchor, and where are they stowed? Include additional tackle, such as dock lines, warps, small stuff, splicing gear, towing bridle, warps, and fenders.
Tenders, etc. Most cruising boats have a tender: hard, RIB… perhaps a kayak or even a sailboard. Include information on these including outboards, onboard equipment, and more.
There may be other topics that apply to your situation. Notwithstanding, you now have all this information and the form of your BIB may is beginning to take shape. It is also probably true that a number of other uses and applications for your book have begun to foment in your mind. That’s great! In the next article, I’ll discuss some of the other uses and applications of your BIB.
PART 2: Applying the Benefits of Your Boat Information Book
Assuming you took up the challenge of creating your BIB, you will have already picked up on some of the benefits of the effort and the value of the derived outputs. When I did my first book several boats ago, I was surprised at what I learned about my boat that I had taken for granted I knew cold!
As you begin to compile your book, its value as a pure reference document will be pretty obvious. Often forgotten, it will also serve as a means of familiarizing guests (some of whom may be “newbies”) or new crew about your boat. Creating a BIB will also steer you towards several other areas. Let’s look at several of these.
Tankage and Systems. In addition to a propane locker with its tank, there are also several other independent systems onboard: fuel, fresh water, waste, and possibly one for gray water (as required by some states). Indicate the capacities of each and the material of each tank. Include a diagram showing each system possibly using separate colors for each. The fuel system should show the off-take and return lines and valves, filters, and the location of the bleeder. If the tank can be “dipped” as in the old days, note it. The fresh water system should include filters, accumulators, pumps, valves, and dedicated breakers. Show the linage, “Y” valves, sea cocks intake and discharge), and pump-out plate for the waste system. Identify any tank access ports for each of these systems if so installed.
De-Watering: List your boat’s bilge pumps and location. Are they all automatic? How wired? How accessed (they do get stopped up?). What are their capacities? Are there any hand back-ups?
Ground Tackle. Identify the anchor type (e.g., plow), numbers and size of chain, and scope and size of the rode; or size and length of an all-chain rode. Are the rodes marked and how? Which anchor is primary; which secondary? Are there others such as a storm anchor or sea anchor, and where are they stowed? Include additional tackle, such as dock lines, warps, small stuff, splicing gear, towing bridle, warps, and fenders.
Tenders, etc. Most cruising boats have a tender: hard, RIB… perhaps a kayak or even a sailboard. Include information on these including outboards, onboard equipment, and more.
There may be other topics that apply to your situation. Notwithstanding, you now have all this information and the form of your BIB may is beginning to take shape. It is also probably true that a number of other uses and applications for your book have begun to foment in your mind. That’s great! In the next article, I’ll discuss some of the other uses and applications of your BIB.
PART 2: Applying the Benefits of Your Boat Information Book
Assuming you took up the challenge of creating your BIB, you will have already picked up on some of the benefits of the effort and the value of the derived outputs. When I did my first book several boats ago, I was surprised at what I learned about my boat that I had taken for granted I knew cold!
As you begin to compile your book, its value as a pure reference document will be pretty obvious. Often forgotten, it will also serve as a means of familiarizing guests (some of whom may be “newbies”) or new crew about your boat. Creating a BIB will also steer you towards several other areas. Let’s look at several of these. Lists: One result of the data collection process discussed in the previous article is to develop a few lists. Phone and fax numbers, emails of suppliers, chandleries, and your homeport mechanic are important. A list of the spares and consumables is next. Start with safety items such as batteries, replacement canisters for your inflatable vest, or redundancy for flares. What system spares will be carried aboard will depend on the type of cruising you plan. For Bay cruising, one need only cover “basic needs” such as a spare water pump impeller. If doing the Intracoastal and then off to the Abacos, Bahamas, having a spare water pump aboard is better insurance. In either case, that clumsy little tool used to replace the ring had best be aboard. In fact, why not have a list of tools to be retained aboard?
Electrical needs may require a closer look. The trend of boaters adding electrically based creature comforts and toys continues its exponential march. If you have not done an energy budget, do one. If it has been some time since your last one, update it. The resultant effort will generate a list of fuses, breakers, bulbs, and much more.
Maintenance details are contained in the various system manuals, but when you need to replace a filter, wouldn’t it be great to just refer to your BIB to verify whether that WIX oil filter is a compatible crossover to the engine manufacturer’s filter? So, make up a specific and detailed list of engine spares and replacement parts. Including web addresses and phone numbers of equipment manufacturers and suppliers will save time and reduce frustration. Identify oil capacities and types, same for transmissions, oil filters, Racor parts, water pumps, impellers, air filters, belts, and zincs (shaft and heat exchanger). The list can be expanded based on ancillary equipment such as a GenSet or the outboard for your tender.
Stowage Plan. From almost any perspective, how you stow your boat is one of the most important aspects of your boating experience. There is an old saying: “A place for everything; everything in its place.” Organize and be neat. Access and convenience are also considerations. When you want it, better know where it is stowed because you might need it… ASAP! Emergencies don’t have a lead time. Stowing the gear needed for safe and comfortable cruising must be planned around where all the lockers and storage areas are located. As an example, the lazarette or similar locker close to the helm can be particularly useful for stowing flares, signaling equipment, and other safety items. If big enough, stow the emergence tiller there as well.
Weight distribution affects performance and possibly safety. Racers carry only the essentials as not to negatively affect speed and performance. Back in the day of pure sail, it was common for ballast (usually rocks) to be moved around and even masts re-stepped forward or aft to improve performance. Cruisers tend to follow George Carlin’s rule of thumb by taking a smaller version of the stuff they have at home and bring it aboard. The end result could be a waterborne example of Grandma’s attic! And where all the stuff ends up can affect how the boat sails. Too much weight on one side produces a list to that side. More weight forward than aft puts her down by the head; too much aft the reverse. Pretty basic but often overlooked.
The key in deciding what and where gear should be stowed is balance. Equalize the weights port and starboard and fore and aft. Start with the location, capacity, and maximum loaded weight of your tanks. Usually, an aft tank will balance out one forward; a similar sized port tank balanced by one to starboard. Installation varies from boat to boat. There are many combinations and no real standard. Don’t ignore your anchor locker. If your boat’s primary hook has an all-chain rode, it will have to be offset by moving other loads aft.
The trick is to balance these fixed loads with the proper placement of your stuff. Vertical balance is as important as lateral. Heavier objects low; lighter stuff higher. Can goods under; cereal over.
Lists: One result of the data collection process discussed in the previous article is to develop a few lists. Phone and fax numbers, emails of suppliers, chandleries, and your homeport mechanic are important. A list of the spares and consumables is next. Start with safety items such as batteries, replacement canisters for your inflatable vest, or redundancy for flares. What system spares will be carried aboard will depend on the type of cruising you plan. For Bay cruising, one need only cover “basic needs” such as a spare water pump impeller. If doing the Intracoastal and then off to the Abacos, Bahamas, having a spare water pump aboard is better insurance. In either case, that clumsy little tool used to replace the ring had best be aboard. In fact, why not have a list of tools to be retained aboard?
Electrical needs may require a closer look. The trend of boaters adding electrically based creature comforts and toys continues its exponential march. If you have not done an energy budget, do one. If it has been some time since your last one, update it. The resultant effort will generate a list of fuses, breakers, bulbs, and much more.
Maintenance details are contained in the various system manuals, but when you need to replace a filter, wouldn’t it be great to just refer to your BIB to verify whether that WIX oil filter is a compatible crossover to the engine manufacturer’s filter? So, make up a specific and detailed list of engine spares and replacement parts. Including web addresses and phone numbers of equipment manufacturers and suppliers will save time and reduce frustration. Identify oil capacities and types, same for transmissions, oil filters, Racor parts, water pumps, impellers, air filters, belts, and zincs (shaft and heat exchanger). The list can be expanded based on ancillary equipment such as a GenSet or the outboard for your tender.
Stowage Plan. From almost any perspective, how you stow your boat is one of the most important aspects of your boating experience. There is an old saying: “A place for everything; everything in its place.” Organize and be neat. Access and convenience are also considerations. When you want it, better know where it is stowed because you might need it… ASAP! Emergencies don’t have a lead time. Stowing the gear needed for safe and comfortable cruising must be planned around where all the lockers and storage areas are located. As an example, the lazarette or similar locker close to the helm can be particularly useful for stowing flares, signaling equipment, and other safety items. If big enough, stow the emergence tiller there as well.
Weight distribution affects performance and possibly safety. Racers carry only the essentials as not to negatively affect speed and performance. Back in the day of pure sail, it was common for ballast (usually rocks) to be moved around and even masts re-stepped forward or aft to improve performance. Cruisers tend to follow George Carlin’s rule of thumb by taking a smaller version of the stuff they have at home and bring it aboard. The end result could be a waterborne example of Grandma’s attic! And where all the stuff ends up can affect how the boat sails. Too much weight on one side produces a list to that side. More weight forward than aft puts her down by the head; too much aft the reverse. Pretty basic but often overlooked.
The key in deciding what and where gear should be stowed is balance. Equalize the weights port and starboard and fore and aft. Start with the location, capacity, and maximum loaded weight of your tanks. Usually, an aft tank will balance out one forward; a similar sized port tank balanced by one to starboard. Installation varies from boat to boat. There are many combinations and no real standard. Don’t ignore your anchor locker. If your boat’s primary hook has an all-chain rode, it will have to be offset by moving other loads aft.
The trick is to balance these fixed loads with the proper placement of your stuff. Vertical balance is as important as lateral. Heavier objects low; lighter stuff higher. Can goods under; cereal over. Obviously, we all know this, but by being a bit more thorough by even weighing some stuff could improve your boat’s performance. Every little bit helps. For long-distance cruisers, special consideration should be given to jerry cans for additional fuel and fresh water stowed topside. These are usually secured mid-ships along the lifelines and may be on one side making compensation to balance a bit of a trick. A life raft stowed aft and low would be much better than higher on the coach roof.
Remember: your task is to equalize and balance the weights port and starboard and fore and aft with your onboard gear given the integral “fixed” weights on your boat.
Once you have figured out the best load-out scheme, make a diagram showing the location of each locker, bin, drawer, etc., and what is stowed in each. And stick to the regimen of that place for everything! When there are changes, make adjustments. They will probably be minor. What is important is that you now have the mind set.
Procedures. Many charter fleets have “how to” and “don’t do” lists. Some are quite detailed. It is a good idea for your BIB to have a few of these. How detailed you want to be is up to you, but there are a few topics that make good sense.
A few procedural “check off lists” seem in order: what to do when opening up your boat, getting underway, and securing. How many of us while on the way back home after a fun weekend wonder if we closed a seacock or shut some switch off? A posted and regularly shut down and lock up procedure could eliminate that worry as well as the wasted effort of going back to the boat when half way home to verify that all is well.
For cruisers contemplating an offshore transit, practicing heavy weather procedures is a must. Similarly, the steps in deploying life raft, activating the EPIRB, and seeing to the ditch bag could save lives. Why not formalize and document them?
Head and galley procedures are “boat keeping” issues. Both can prove problematic. The head list can be as simple as “Don’t put anything in the WC you haven’t eaten first!” A more detailed process for dockside and off shore pump out could save you larger problems and even avoid a fine. Lighting off and securing your propane system the same way every time is a safety issue. There are other individual preferred procedural areas you may wish to include such as deploying and securing your tender or possibly addressing dive gear for the extended cruiser.
The objective of these two articles was to put information about your boat to work for you and your crew. How you organize your BIB that best fits your style and needs is up to you. Hopefully, these thoughts have been helpful. Perhaps your book would even play well to that future potential buyer in meeting your asking price. #
Obviously, we all know this, but by being a bit more thorough by even weighing some stuff could improve your boat’s performance. Every little bit helps. For long-distance cruisers, special consideration should be given to jerry cans for additional fuel and fresh water stowed topside. These are usually secured mid-ships along the lifelines and may be on one side making compensation to balance a bit of a trick. A life raft stowed aft and low would be much better than higher on the coach roof.
Remember: your task is to equalize and balance the weights port and starboard and fore and aft with your onboard gear given the integral “fixed” weights on your boat.
Once you have figured out the best load-out scheme, make a diagram showing the location of each locker, bin, drawer, etc., and what is stowed in each. And stick to the regimen of that place for everything! When there are changes, make adjustments. They will probably be minor. What is important is that you now have the mind set.
Procedures. Many charter fleets have “how to” and “don’t do” lists. Some are quite detailed. It is a good idea for your BIB to have a few of these. How detailed you want to be is up to you, but there are a few topics that make good sense.
A few procedural “check off lists” seem in order: what to do when opening up your boat, getting underway, and securing. How many of us while on the way back home after a fun weekend wonder if we closed a seacock or shut some switch off? A posted and regularly shut down and lock up procedure could eliminate that worry as well as the wasted effort of going back to the boat when half way home to verify that all is well.
For cruisers contemplating an offshore transit, practicing heavy weather procedures is a must. Similarly, the steps in deploying life raft, activating the EPIRB, and seeing to the ditch bag could save lives. Why not formalize and document them?
Head and galley procedures are “boat keeping” issues. Both can prove problematic. The head list can be as simple as “Don’t put anything in the WC you haven’t eaten first!” A more detailed process for dockside and off shore pump out could save you larger problems and even avoid a fine. Lighting off and securing your propane system the same way every time is a safety issue. There are other individual preferred procedural areas you may wish to include such as deploying and securing your tender or possibly addressing dive gear for the extended cruiser.
The objective of these two articles was to put information about your boat to work for you and your crew. How you organize your BIB that best fits your style and needs is up to you. Hopefully, these thoughts have been helpful. Perhaps your book would even play well to that future potential buyer in meeting your asking price. #